Introduction
Drupal holds most of its configuration in an SQL database. The Backup and Migrate module allows you to take a copy of the database and both save it on the web server and download a copy, as well as scheduling backups. This makes it very easy to copy one drupal site to another, most notably our test site. You can take a copy of your production site and then restore that backup to your test site. You can then freely play around with your test site and use this to copy it to your production site. Its worth considering before you copy a test site over a production site that the production site may have changed in the mean time. If you have a forum for example there may have been dozens of new post. With Small changes I test them on the test site first and once I'm happy with how they work and are setup I perform the same changes to the production site. In cases where a large change is necessary it may be worth considering putting the site into read only mode which we will look at later.
To download the backup and Migrate module see the drupal site.
http://drupal.org/project/backup_migrate
Personally I put it in a folder Drupal/Modules just to keep things neat. The latest version at time of writing if 7.24. Download and extract it the same way you did with the core files.
Installing Backup and Migrate
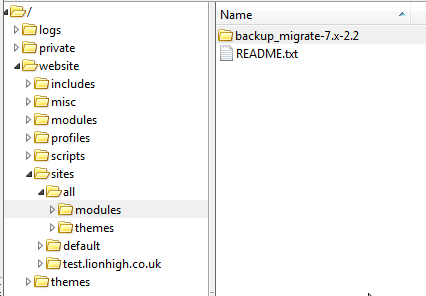
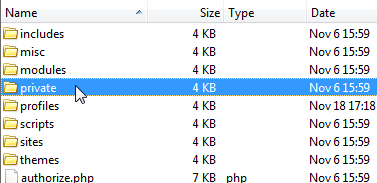
Now we need to connect to our server via ftp. There is a folder in our Drupal install called "sites". If you have been following this guide you will have 3 folders inside it, "all", "default" and "test.lionhigh.co.uk". Inside each of these folders you can have "modules", "libraries" and "themes". The "libraries" folder isnt there in core installations but we will need to add it later. We want the backup and migrate module to be available to all our sites so we are going to place backup and migrate in the all/modules folder. Open your ftp client and copy your newly extracted Backup and Migrate folder into website/sites/all/modules. While you are logged in now would be a good time to create a private files folder. This needs to go in the root directory of your website (for now, more on that later). Right click in the right hand window and selecr "Create Directory" name it "private". Take note that if you have been following this guide you will have a user private folder. This is not the same. The first private folder beloned to the user. This one belongss to the website. It should be /website/private if you mave been following so far.
Enabling the Module
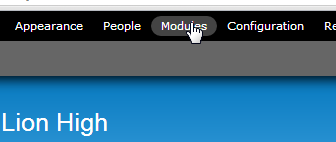
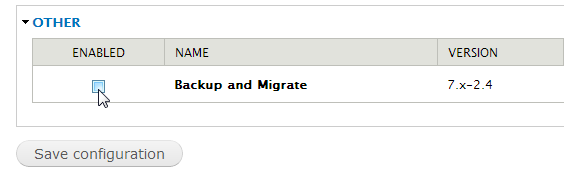
Now the Backup and Migrate module is available to our website we need to enable it. To do this open your website and log in as the site Maintainance account. If you used the standard installation profile you will see a menu at the top. Click on modules. This will show you the list of modules avilable to your site. Some of them will already be enables. Scroll down until you find the Backup and Migrate module. Check the Enabled box and then click Save Configuration. You will also need to do this on your test site.
Configuring Backup and Migrate
Now that is is enabled we need to configure backup and migrate. Theres not much to configure. First if this is on a fresh standard installation then we need to set up the websites file system. It will already be configured for public files but we need to put our backups in a private directory so Drupal will block access to them. Click on Configuration to be take to the main settings page. Scroll down to the media section and click on filesystem.

On the configuration page you will see options for a public directory, private directory and a temporary directory. The public directory is for any files that can be accessed by anyone. That includes files you put up for download, or images you include in pages or anything similar. Drupal will block access to the private folder unless your an administrator, you should still be able to access it if you log in via ftp though. The tmp folder contains system generated files that will get deleted regularly, mostly cache files.
While it is bad practice to do so, I usually setup my main site and test site to share the same private directory. In some circumstances this can be problematic but for now we will share the same folder. It will make things easier when we are copying our test site back and forth while we play around with new modules. In the private box simply put "private". You will also notice that your main site has a public folder "sites/default/files" and your test site has a public folder "sites/test.mysite.co.uk/files". This is fine but it means you will have to copy the contents of one to the other when moving your test site to the production site. It is easier at this stage to set them both to "sites/default/files". Its not a good idea to leave it like this. You might accidentally delete a file on your test site that affects your production site but for now as they are both brand new thats not really an issue and it saves us the job of copying files.

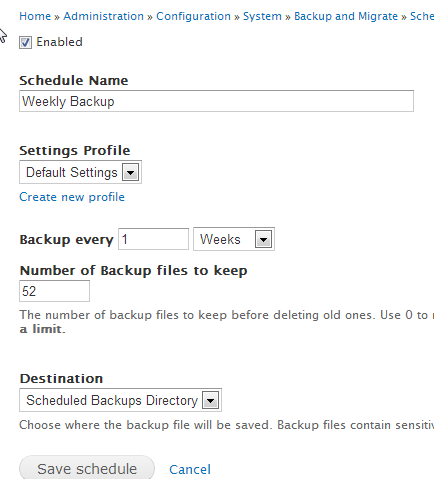
Now we can actually setup some backups. Click on configuration and then on Backup and Migrate. Backup and Migrate has 5 tabs. We will start on the Schedule tab, click on it. The click on ass schedule.


Now you need to decide how often you want to perform backups and how many you want to keep. This will all depend on what the site is for so you will have to decide that for yourself. You can have as many schedules as you like though so you could do a weekly and a monthly backup for example. In the image below I have called the schedule "Weekly Backup" I have set it to backup every 1 week and to keep 52 backups, or 1 years worth. When your happy click save.
Manual Backups
To be able to Migrate from our test site to our production site or the other way round we need to be able ot backup manually. First pick which site you want to clone and go to the backup and migrate configuration page. All you will have to change is the second box, the destination. The default is to download the backup but its much easier to place it in our manual backups directory. Click Backup now. Thats it you have made a backup.

Restoring the backup
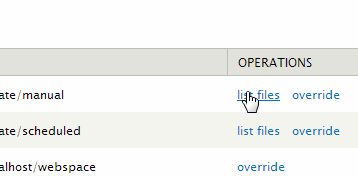
Next we need to restore our backup. Assuming you took a clone of your production site first now go to the backup and migrate configuration page on your test site. Of the 5 tabs click on destination. You will now see 3 entries, Manual backups, scheduled backups and default database. On the manual backups row click list files. You will now be given a list off all the manual backups you have taken. The most recent should be at the top of the list. Click on the restore button. You will be given a warning that this will delete some/all of your data. When your sure click on the Restore Button. Bear in mind that if there have been significant changes or its a very large database it will take a very long time. I've had a site that took well over 5 min before so just wait. You should see the timer going round in your web browser while this happens.

Thats it, you should now be able to clone your site whenever you like. Don't forget that you may want to change your filesystem settings later so that your public and private files are not in the same directory. I'd wait until you have a workign site first though. While they are both test sites its best to save on the legwork. You can, and should, do a backup and clone it to your test site whenever your about to try out a new module. Its handy both to experiment with the module without cluttering up your database and incase anything breaks the site.