If you haven't already, download yourself a copy of Ubuntu Server 12.04 LTS, and burn it to disc (or mount it if using a VPC). I should point out last time I tried to download Ubuntu Server the website tried to give me the Alternate version. No idea why, just keep an eye for it. You don't want to wait for the download to find out you have the wrong version. Also feel free to use a later version. 12.10 is due out now but I'm doing this with 12.04 because its the LTS release. I doubt 12.10 will be vastly different but if you do run into problems please ask on the Ubuntu Forum.
Make sure your server is network connected. Network configuration will be setup during the install. My server is plugged in by ethernet before starting. If your running a VPC with virtual box change the network dadapter type to "Bridged Adapter" rather than "NAT". This will give your virtual server direct access to your network rather than having to relay through your host system. Boot from the CD and the first thing you see is the Select language screen. This is the language for the boot disc, not the installation so we get asked exactly the same question in 20 seconds time, but hey why not. Select your language then select "Install Ubuntu Server". Then Select your language. Hopefully you have a slow system so you've had long enough to forget you just did that.


Next you need to select your country of origin. For me that's UK. This is used to set up things like your time zone. You are then asked to set your keyboard. It will detect this for you if you like. It asks you to press a series of buttons to determine your layout. I skipped this. I find it faster to define it manually. If you're not 100% sure which keyboard you have then select detect. Theres a surprising number of UK keyboards


Next is a lovely loading screen where you get to watch it install the basic server components. On my server this took about 30 seconds. Then your asked to set a Hostname. The hostname is the name that will appear to the world if they query your server. Something like MyWebServer will be fine although it can be anything. The default is ubuntu but that's a bit too generic.


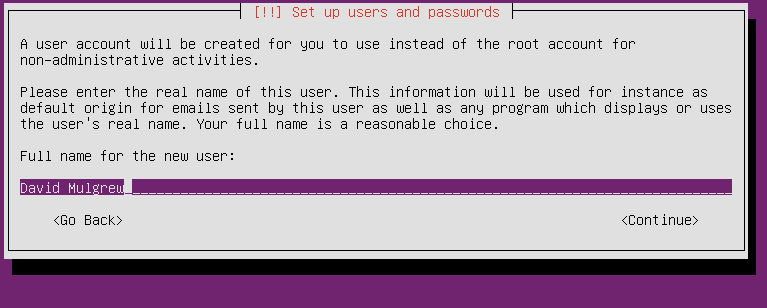
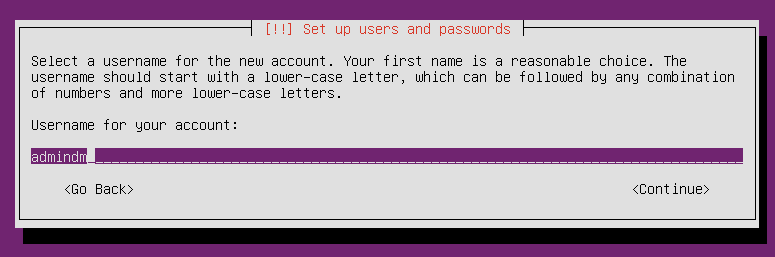
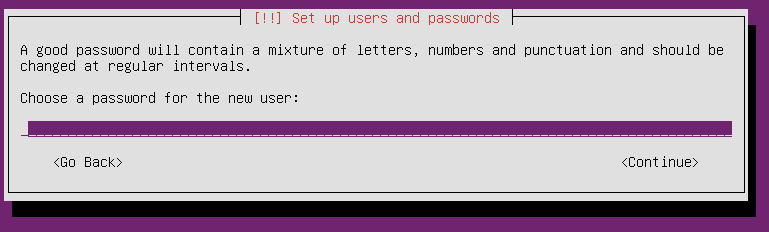
Next your asked to create a user account. Most things are done as a root user but you get a normal account too. A root user is similar to an administrator in a Windows system. Anything that can damage the system requires root access, much like installing things in Windows requires administrator access. They are not exactly the same thing but that's a reasonable enough analogy. Even your own account on this system will be restricted. In Linux you need to explicitly run commands as root, more on this later though. To create your user account your first asked for your real name. This does not strictly need to be your real name. I have used my real name but you can use anything you like. Once you set a real name your asked to set a username. This is your accounts name and will be the name you use to log in. In this example I'll be using admin as my user name. Next comes the password. Naturally you get asked this twice.
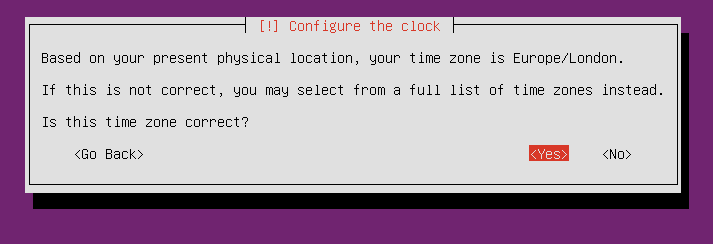
So far so good. Next your asked if you want to encrypt your home directory. If you have private files stored there then it should be encrypted. My home directory has nothing of value in it so I'm leaving it un-encrypted. In certain web configurations your home directory is also where you store your website, this is the case when running multiple sites. Each user has their own site and own home directory. This is what we are going to do. You don't need to do this but my server is also accessed by family members uploading to their hobby sites. By putting their own sites in their home directory I can restrict access to their home directory so they cant damage anything on the server. If your doing this too the DO NOT encrypt your home directory or anyone trying to access your site will need to log in with your details first, this isn't going to work. You will also be asked to confirm your time zone. If its wrong or for some reason you want to set it incorrectly select NO and then set it manually from the list

Next comes setting up the hard drive. If your hard drive isn't empty please make sure its backed up. The method here will erase the contents. If its full you'll probably get a few more options than I have. If your installing to a single disc drive then simply select "Guided - use entire disc" This is by far the simplest method. After selecting this you will be asked to select a hard drive to install to and then to confirm the changes. Check it looks correct and then select the option to finish. You'll notice an option for LVM, this is Logical Volume Manager. LVM is much more flexible and allows you to easily resize partitions and add drives to a partition later. If you don't need to do this then don't bother using it, it just adds complexity. In my case I want to setup RAID so I can have a mirror. I have two blank hard drives inserted so I'll be selecting manual install, see next paragraph.
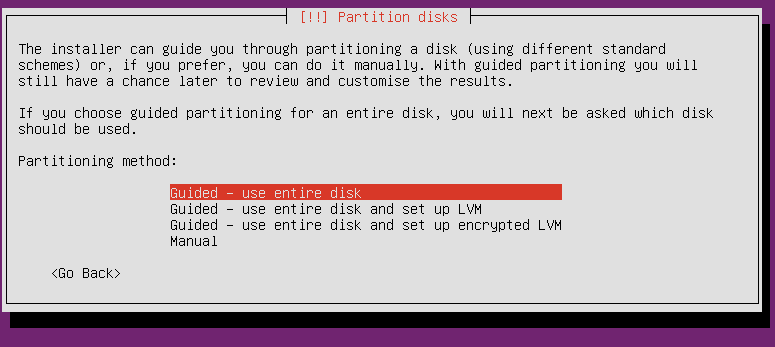
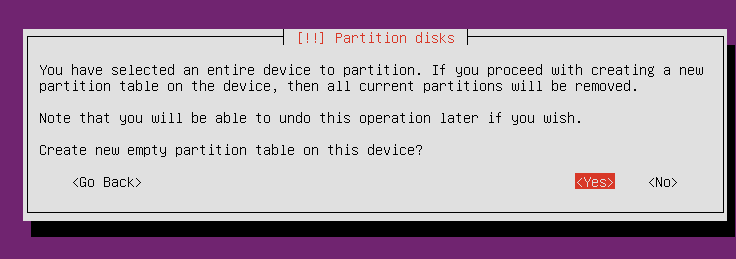
If you only have one disc you can skip ahead. I want to setup RAID 1. A mirror so my website and email data will be safe. Theres lots of ways to do this. The ubuntu server guide shows how to do this in the terminal but I like buttons and menus so I want to do it using the install menu. Firstly Select Manual install. To get our server to work we need a SWAP partition. This is kind of like virtual memory. We also need a root partition. A root partition means everything else goes in here. Its kind of like Windows (C:). If I carry on like this I'm gonna upset a lot of Linux pros who will tell me just how different root is from C: and so on. In the case of my test system the hard drives I'm using don't even have partition tables. You have to select each drive and you will be asked to create a partition table. Select yes and it creates one for you.

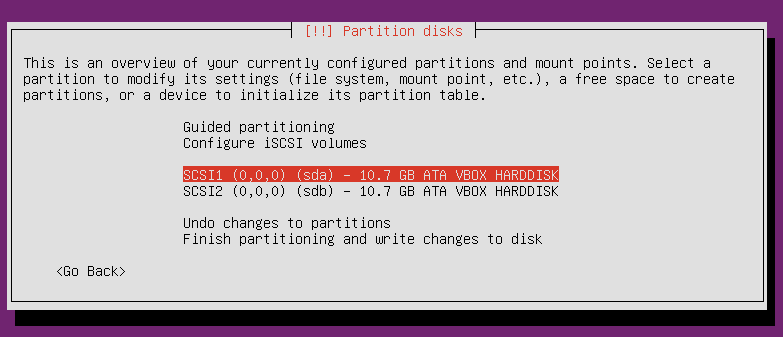
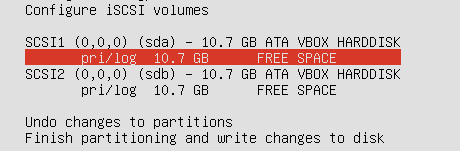
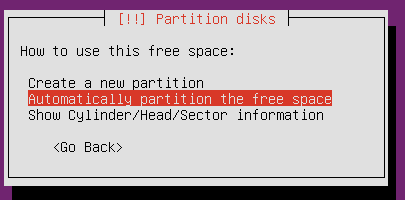
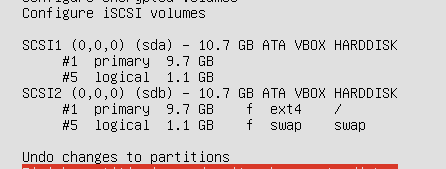
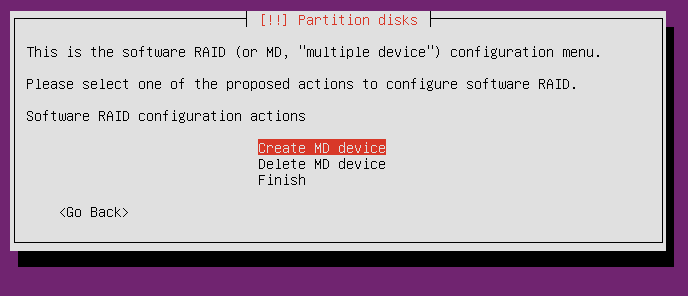
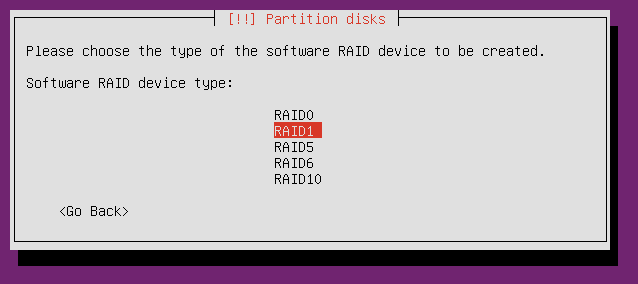
Once you have empty partition tables you can partition the drives. Select the partition table and then select "Automatically partition the free space". This should create two partitions. 1 primary and 1 logical. Do this for both drives. It will automatically assign a root "/" and swap partition, this is pointless as we are going to change this. Next select "Configure software RAID" You will be warned of the changes you have already selected and asked to save the partition tables. Select yes. You will then be presented the option to create or delete an MD device. MD is multiple disc. Select Create MD device. First off select RAID 1, mirror. You will be asked for an active number of devices. The minimum for a mirror is 2. Basically its asking you how many partitions you want to use for this RAID array. 2 should be the default so just accept it. Your then asked to select number of spare devices to use. This is for devices that will automatically replace failed devices. I'm not using inactive devices so I accept the default of 0. Next your asked to select which partitions will form your RAID array. In my case I have 4 in the list. 2 large ones and 2 small ones, sda1, sda5, sdb1, sdb,5. The sda stands for serial disc a, with sdb standing for serial disc b. If your on an IDE drive you will likely see hda and hdb. This is hard disk a and hard disc b. The number refers to the partition number. Don't ask me why the swap partition gets assigned as partition 5, I have no idea. Feel free to add a comment if you know the answer. I want to select the two largest partitions. After selecting continue I'm again asked to confirm changes to the partition tables. Selecting yes should be fine as long as you have checked everything is correct. This drops you back to the menu where you can create an MD device. Select finish.

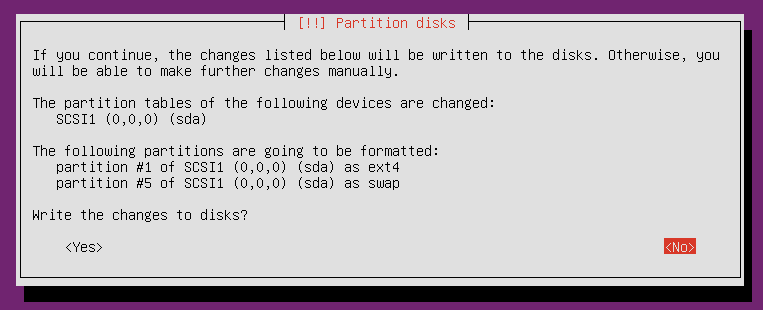
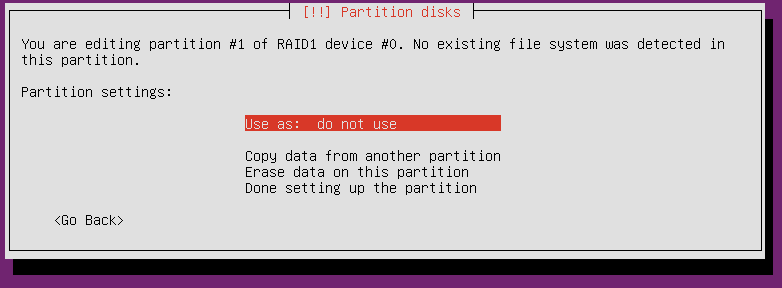
You should now be looking at a devices list but now you will have an extra devices. The new device represents a virtual disc you just created with the RAID manager. You will also notice that the old devices have RAID noted on each partition. You will also notice that the RAID partition has no partition type. We need to set this manually. Select the RAID partition. Make sure you select the partition itself rather than the RAID device. You'll notice that "use as" is set to do not use. select this and set it to "ext4". I don't know full details of why certain ones are better than other file systems, ext4 is the most up to date and in most common use. When you set it to ext4 you get a host of other options. The only one you need to change is the mount point. You need to set it to "/ - the root of the file system". Then select done setting up partition. We could setup our two swap partitions as a RAID 0 here but that would cause issues if a disc ever failed. We would have to repartition our swap area for everything to run correctly. Later we will rig the swap to write to both swap partitions anyway in a similar way to RAID but without the risk for now though it will only write to one swap when its filled the other. You may have noticed that partition #5 on sda unset itself as swap when #5 on sdb set itself to swap. We need to make sure both are set as swap. Select partition #'5 on sda and set its "use as" to "swap area" This gives us two swap areas. Lastly you need to select "Finish partitioning and write changes to disc". You will get a warning about your root partition being on a RAID array giving the option to boot the system if your RAID is degraded or to boot into recovery mode. I'll be accessing my server remotely so I selected yes to boot automatically even with a degraded RAID array. You are given one last chance to check the setup and confirm things select yes and we can get going. Now we finally get to install the system.
Once you have setup you hard drives the system will install the basic system components. You will be asked at this point if you are using a proxy. If your not using a proxy you simply leave this blank and select continue. You will then be asked to choose your update frequency. You can do this manually every now and then but I prefer it to be automatic. Notice only security updates are automatic. If you have a lot of cash to throw around you could register for Landscape. Landscape is a paid for service run by canonical to help manage multiple servers. I'm told its excellent but on the small number of servers I manage its difficult to justify the cost.

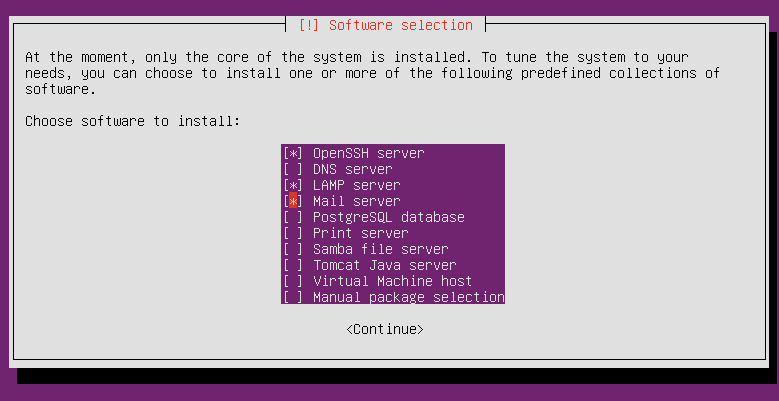
Now you get chance to specify your packages. This makes it easy to install groups of applications all at once. Saves messing around later, or at least some of it. For our web/email server we want to select OpenSSH server, LAMP server and MAIL server. OpenSSH will allow you to connect to the sever remotely. We'll look at this in detail later but its much easier to connect remotely, even on a local connection. As its a server its likely going to be tucked away under your desk and you don't want a monitor and keyboard in your way. LAMP is Linux, Apache, MySQL and PHP. Our Linux in this case is of course Ubuntu Server. Apache is the web server software itself. If your only doing basic HTML web pages this is all you need. Drupal however requires an SQL database and that's where MySQL comes in. Its also based on PHP so of course we need PHP. Mail server is fairly obvious. Later we will be installing a few more packages but these will do for now.
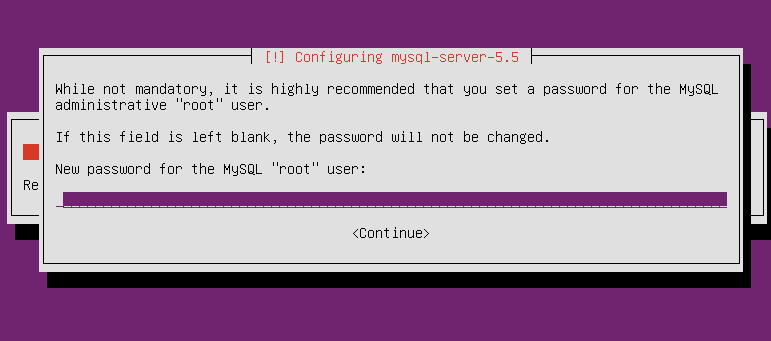
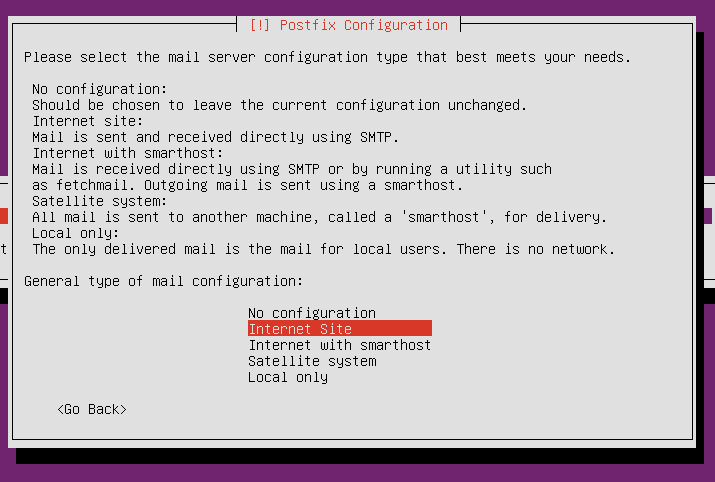
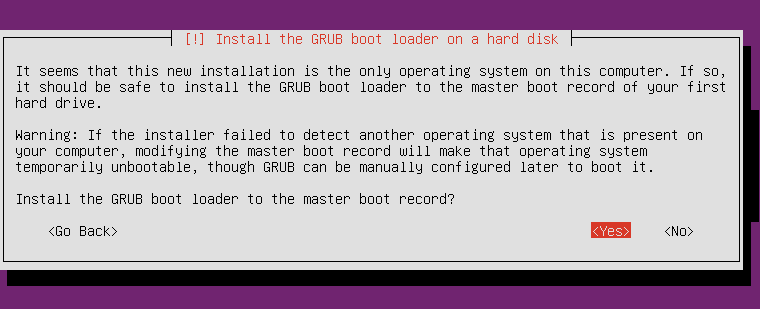
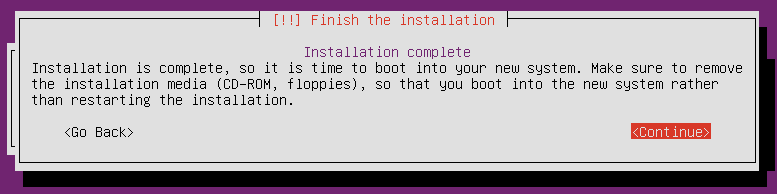
You'll now be asked to specify a MySQL root user password. This is NOT the ubuntu root user although you can have the same password if you wish. It would be better of course to have different passwords for everything, but we are all human. Next you are asked which internet configuration you would like. I would recommend you use "internet site" unless you know how to configure everything yourself or you know what and how to setup a smarthost. You're then asked for a mail name. Mail name is the part of your email address after the @ symbol. So you want something like yoursite.co.uk. One last thing to do. GRUB needs to be setup. If you only have one OS on this server then that will be automatic. GRUB will ask if automatic setup is fine. Select yes. It will whirr away for a short while longer and then present you with the completion screen. All that's left now is to reboot your server where you will be greeted by the login prompt. Give yourself a pat on the back, its time to start configuring things.