So if your a gamer you have probably heard of Teamspeak 3, the voice chat application. I was running one on my Windows PC but it makes much more sense to run it on my always on web server so my Guild memebers can use it all the time too. This guide will assume you have followed the whole Drupal guide. If not you will need a LAMP server with phpmyadmin, so either look back in the earlier pages on how to set this up or Google it. Since this server has MYSQL we will also be making use of that.
Before we get started I'd also like ot thank Archi on the teamspeak forums. Archi's guide is the first one I found that was both complete and usable, many simply didn't work or didn't give inexperienced users enough information to change the bits they needed to change. While it's not 100% applicable to my case, there were some changes, its still very useful so you may want to take a look at the original.
Lets start by creating ourselves a user for the teamspeak client to run under.
sudo adduser --disabled-login teamspeak
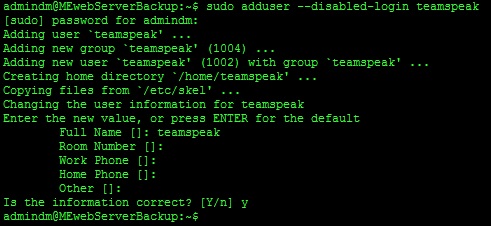
This command will create the new user but it will also disable the users ability to login. We don't need to login with the teamspeak user so this adds an extra level of security.
Next we need to download the teamspeak files. We are going to save these in the home directory of the new teamspeak user.
sudo bash
su teamspeak
cd ~
wget http://teamspeak.gameserver.gamed.de/ts3/releases/3.0.10.3/teamspeak3-server_linux-amd64-3.0.10.3.tar.gz
tar xvf teamspeak3-server_linux-amd64-3.0.10.3.tar.gz
mv teamspeak3-server_linux-amd64 teamspeak
cd teamspeak
chmod +X ts3server_linux_amd64
chmod +X ts3server_minimal_runscript.sh
nano ts3server.ini
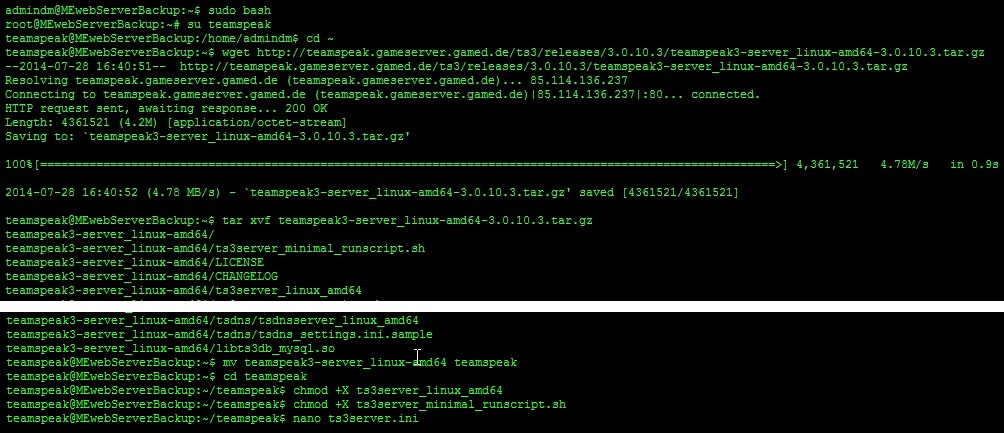
So we swap into the new teamspeak user and cd into the new users home directory. Then we download the server software. 3.0.10.3 is the latest at the time of writing. You may wish to change the part in bold if a newer version is out. ONce we have downloaded it we use tar to decompress it. Once we have decompressed the file we use mv to rename it to something simpler and then we cd into the new directory. Then we need to add Execute privleges to 2 of the files so we use chmod for that. Lastly we create a new file with nano for the server configuration. You may wish to change the port numbers but the default should be fine.
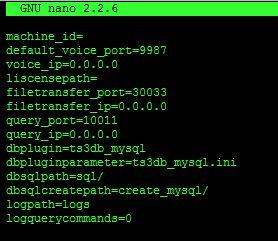
machine_id=
default_voice_port=9987
voice_ip=0.0.0.0
liscensepath=
filetransfer_port=30033
filetransfer_ip=0.0.0.0
query_port=10011
query_ip=0.0.0.0
dbplugin=ts3db_mysql
dbpluginparameter=ts3db_mysql.ini
dbsqlpath=sql/
dbsqlcreatepath=create_mysql/
logpath=logs
logquerycommands=0
Next we are going to create a mysql user for teamspeak and then create a database to use for teamspeak. First we need to switch back to our admin user, in my case admindm.
su admindm
sudo mysql -h localhost -u root -p
create database teamspeak;
grant ALL on teamspeak.* to teamspeak@localhost identified by 'newpassword';
exit
This logs us in to the mysql root user. You will be asked to give your root password. Then we create a new sql database "teamspeak". Then we create a new sql user called "teamspeak" and grant that user all privlges on that database. Don't forget to change "newpassword" to somethign that suits you. This will be the password that the teamspeak server uses to access the sql database. Finally we Exit MYSQL.
Next we will switch back to the teamspeak user and add the sql configuration.
sudo bash
su teamspeak
cd ~/teamspeak
nano ts3db_mysql.ini
To the new file we will add the following.
[config]
host=127.0.0.1
port=3306
username=teamspeak
password=newpassword
database=teamspeak
socket=
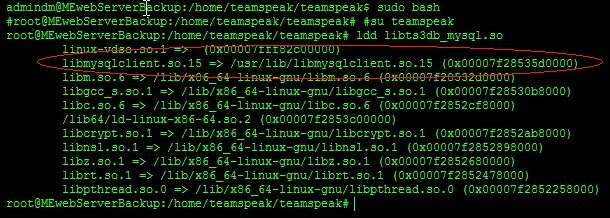
Next we have a an issue to solve. Run the following command and watch the output.
ldd libts3db_mysql.so

I had a major problem with this because the TS3 forum posts I came across told you to download it and place it in the teamspeak folder, didnt work. Often when I did find the file for download the links were broken. I would recommend you get the file from an official source but to save you the hassle I had heres a copy libmysqlclient.so_.tar_.gz. The following should download and install it for you.
su admindm
cd ~
wget http://foreverythingit.co.uk/sites/default/files/files/libmysqlclient.so_.tar_.gz
tar xvf libmysqlclient.so_.tar_.gz
sudo mv libmysqlclient.so.15 /usr/lib/libmysqlclient.so.15
This will download the file form this site, fell free to change the address to an official source, I won't be offended. Then we decompress it and move the file to /usr/lib.
Lastly we need to test its all working.
sudo bash
su teamspeak
cd ~/teamspeak
ldd libts3db_mysql.so
So lets start our server for the first time. We need some infor from this that we will need to save. To start the server run the following.
su admindm
sudo bash
cd ~
su teamspeak -c '/home/teamspeak/teamspeak/ts3server_minimal_runscript.sh inifile=ts3server.ini' &
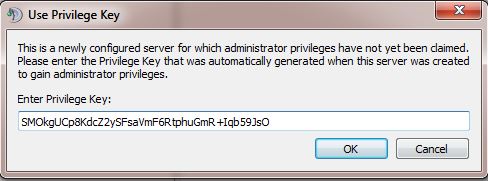
So this switches me to my admin user since the teamspeak user can't use sudo. Then we switch to the root account and cd to roots home directory and then run teamspeak using the minimal runscript provided in the download.You will be given a serveradmin username and password, and given a token. The token is very important. Save all this info to a text editor for now for safe keeping, you will need it when you first run your server. Oh and before anyone worries about me showing you my server token, this is a test server to double check my method and is going to be deleted after I've finished writing this guide.

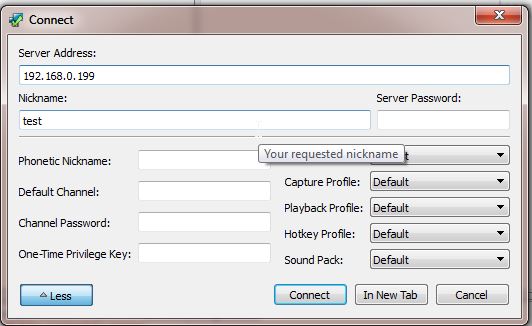
Now its time to try connecting to the server with our teamspeak client. If you followed my whole guide you will have already opened your firewall ports. If not the ports you need are listed below and at the bottom of the Ubuntu Server Configuration page of this gude. How to configure the firewall is listed on the Initial Server Configuration page. Assuming your firewall is configured open your teamspeak client, click Connections on the menu and then on connect. Type in the local IP of your server and a username. Then hit connect. You will be asked for a privlege key. This is the token that was given in the command line when you first started the server. Congratulations, your now connected as an admin on your server.

Next we need to set the server to start automatically when we reboot the server.
sudo nano /etc/rc.local
In the file find exit 0 and just before place the following
sleep 2
su teamspeak -c '/home/teamspeak/teamspeak/ts3server_minimal_runscript.sh inifile=ts3server.ini' &
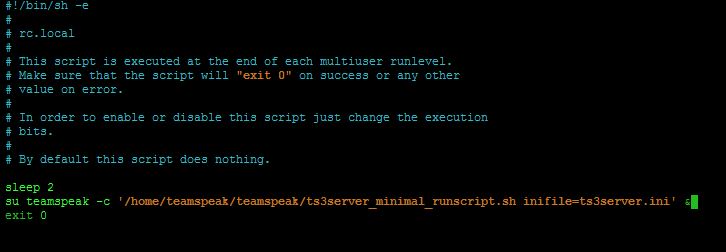
The sleep 2 is there just to make sure mysql has finished starting before we start teamspeak. The second command actually runs the server during boot. Now reboot your server and test connecting again. If you have done everythign correctly you will be able to connect to your server and it should have started automatically. Now its time to test it from WAN. Bear in mind that some ISPs and routers won't let you connect using your wan IP address from your own network so you might need to ask a friend for help.
Don't forget to open the necessary ports in ufw and in your router. You will need the following ports.
9987/UDP - INPUT/OUTPUT (voice)
10011/TCP - INPUT/OUTPUT (serverquery)
30033/TCP - INPUT/OUTPUT (ftp)
2008/TCP - OUTPUT (licensecheck)