Now we have a working server its time to secure it. There are a few initial configurations you will want to make most of which relate to security
No more tiny screen
Its worth noting that on some setups the screen size isn't appropriate or the text may be too small. I regularly use a VPC for testing and its irritating that it runs in 640x480 graphics mode. This means hardly anything fits on screen and I have to force outputs from commands (if possible) to display page by page. My physical server set the screen size appropriately so I'm happy with that but for the VPC I want to force it to a higher resolution. To do this you need to edit the file /etc/default/grub.. Use this command
sudo nano /etc/default/grub
Your looking for the line that states #GRUB_GFXMODE=640x480. The # is to commment out the line, this ignores the setting. We need to remove the hash from the start of the line. Then we need to set it to a resonable resolution. This can be anything your monitor/vpc supports. Personally I set my VPC to 1024x786, this is one size down from the resolution of my second monitor which makes the screen large enough to work with but leaves space for all the virtual box interface elements. Once you have made the changes you need to run
sudo update-grub

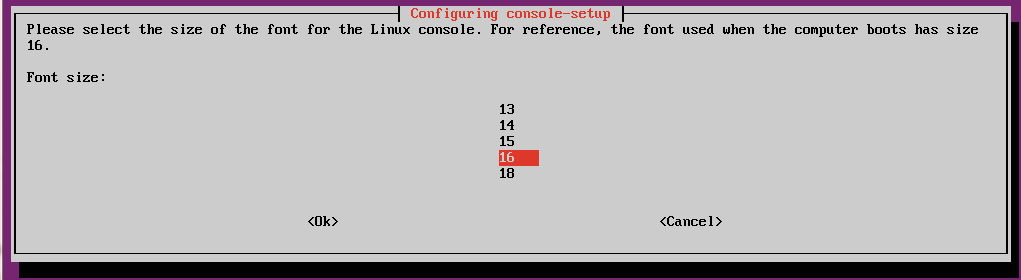
I have good eyesight so the default text size is fine for me, and will be for most of you, but if you prefer to work without your reading glasses then you might want to up the text size. Use this command
sudo dpkg-reconfigure console-setup
This will let you select things such as the font you use but most importantly the text size. Different fonts have different sizes available so experiment to see what suits you best.
No more Ctrl+alt+delete.
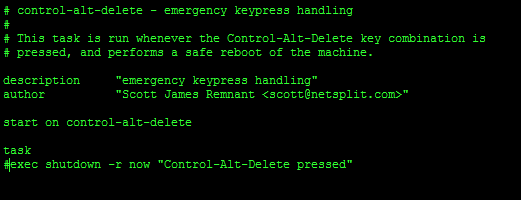
You wouldn't want anyone rebooting the server by accident. This is often disabled as a security measure. At home its more likely you will do it by accident or without thinking. To disable Ctrl+alt+delete rebooting you need to edit the file /etc/init/control-alt-delete.conf. To do this log into the server type the following command in your new terminal
sudo nano /etc/init/control-alt-delete.conf
Comment out the last line by adding a # at the start. It should now read
#exec shutdown -r now "Control-Alt-Delete pressed"
The Firewall
Ubuntu contains a firewall which is disabled by default. It is a good idea to enable it. Lets face it, for a web server we only need a small number of ports open so why leave the system wide open. Ubuntu's firewall is called Netfilter. You will rarely hear of Netfilter because we use other programmes to manage it. We use iptables to manage Netfilter but for most users its better to use a configuration tool that simplifies the configuration. The default tool for Ubuntu is ufw - Uncomplicated Firewall. This is simple and easy to use. There are others but considering we will only be doing a few basic configuration changes its probably best if we just use ufw. I really expected to have to do this locally, you even get warned when enabling the firewall that it will break SSH sessions. It didn't kick me out though so I did all of this via SSH. ufw is disabled by default so step one is to enable it.
sudo ufw enable
Then we need to allow SSH,
sudo ufw allow 22
We need to add all the ports we have forwarded in our router, otherwise the router would forward the packets and then the server would reject them. Heres an example
sudo ufw allow 20
sudo ufw allow 21
sudo ufw allow 80
You need to do this for every port you opened in your router. You can do a lot more with the firewall but for our purposes this is fine. For full details see the Ubuntu help pages
CA / SSL Certificates
These are a pain in the backside, mainly because for them to have any validity you need to pay for a 3rd party certificate, more on this later. Basically for any form of encrypted, secure browser or email connection your browser needs to identify the server. It does this with a CA certificate. Browsers maintain a list of recognised Certificate Authorities and if your certificate comes from one of them then the secure connection will be accepted. If your certificate is from an authority unknown to the browser it will inform your visitors that your security certificate is invalid. If you don't have a certificate you can't use secure connections like https. You can create your own CA certificate but that will mean its not recognised by browsers and gives an error message to your site visitors. I'm going to show you how to create your own but I recommed that at this step you get yourself a decent 3rd party certificate.
Regardless of where you get your certificat from we need to creat a CSR before we do anythnig else. This is a Certificat Signing Request and its used to generate your CA certificate. You need to supply a CSR to a CA authority or use it to generate your own certificate. We need to create two keys to create a CSR. One key needs to be secure. It needs to have a password. The other key needs to be insecure. It needs to not have a password. If you create a CSR with a password then you will need to enter a password to be able to use the certificate. Obviously we need our server to work without the hassle of typing in passwords every time its rebooted or a secure connection is needed.
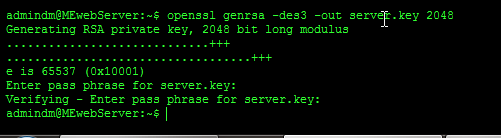
First we generate the secure key to do this we use this command.
openssl genrsa -des3 -out server.key 2048
It should give us this output
Generating RSA private key, 2048 bit long modulus
..........................++++++
.......++++++
e is 65537 (0x10001)
Enter pass phrase for server.key:
You now need to enter a passphrase and confirm the passphrase. I won't lecture you on proper passwords but don't make it an easy one. This should put your secure key in a file called server.key.
Now we have our secure key we can use it to generate an insecure one. To do this we use this command
openssl rsa -in server.key -out server.key.insecure
This will ask for your password and then it will use the key in the file server.key to create an insecure key in the file server.key.insecure.

Now we need to shuffle the key names so that our secure key is in a file server.key.secure and our insecure key is in the file server.key, To do this we use the mv command. The mv command is used to move files but we can also use it to rename files too. Type the following two commands in your terminal
mv server.key server.key.secure
mv server.key.insecure server.key
Finally we can crate the Certificat Signing Request. To do this we use this command.
openssl req -new -key server.key -out server.csr
This uses the insecure key in the file server.key to create a CSR in the file server.csr. It will prompt you for your company name, site name, Email ID etc. If your creating your own CA certificate then these just need to make sense to anyone who checks your certificate. If your getting a 3rd party certificate it needs to be accurate.

Now we have a CSR its time to get our certifficate. I seriously recommend you get a CA-Signed Certificate. There are loads of Certificate authorities, just google it. I'll consider guiding you through one later if theres demand. For now I'll show you how to generate your own certificate. This is fine for testing but getting a security warning scares most users off so it's not a good idea for a production site. To generate your certificate run the following command at a terminal prompt.
openssl x509 -req -days 365 -in server.csr -signkey server.key -out server.crt
This creates you a certificate in the file server.crt. The certificate will last 365 days

Time to install your new certificate. You need to install BOTH the key file used to generate your certificate and the certificate itself. All we need to do to install them is to copy them into the right place. To do this we use the cp command. CP is copy. To copy both the key and certificate to the correct places run these commands in a terminal.
sudo cp server.crt /etc/ssl/certs
sudo cp server.key /etc/ssl/private

Later we will need to configure Drupal and our email server to use these certificates but for now lets move on.