Apache Setup Introduction
Now we have a domain name we need to setup apache so that it listens for the domain name and forwards that domain on to the folder where our website is stored. We also use apache to get www.yoursite.co.uk to forward to yoursite.co.uk. If you don't setup a forward your site will still work for both addresses but the search engines will count your domain and subdomain as two different sites and think that one is duplicate content of the other. By setting up a forward we tell the search engines that one is actually an alias for the other.
Apache Setup
Before we can setup apache to listen to requests for our site we need to create a file that will tell apache how to do this. As you may have guessed when you typed your server IP address into a web browser apache already has a default configuration. The default configuration listens for all http requests to the server and directs them as instructed in the default file. This default file is a good place to start so we are going to create a new file by copying the default file. The file name is not important but its best to use something meaningful. Run these commands in a terminal.
cd /etc/apache/sites-available
dir
sudo cp default mysite.co.uk
dir
sudo nano mysite.co.uk
The "cp" command copies fileA (default) to FileB (mysite.co.uk). Take note that where Windows systems require a file extension, having a full stop in a file name in most linux systems has absolutely no meaning and is simple there to make it more human readable. The "dir" shows the directory contents so we can see that the copy worked and then we open the file in nano. Heres what we see when we open it. I'll the complete file with changes at the bottom but as we go I will just post the relevant parts. For the rest of this page I'll also be using the "granny" username that I used in our previous example and the website lionhigh.co.uk although I'm going to leave the email address out so the spam bots don't get it.
<VirtualHost *:80>
ServerAdmin webmaster@localhostDocumentRoot /var/www
ScriptAlias /cgi-bin/ /usr/lib/cgi-bin/
<Directory />
Options FollowSymLinks
AllowOverride None
</Directory>
<Directory /var/www/>
Options Indexes FollowSymLinks MultiViews
AllowOverride None
Order allow,deny
allow from all
</Directory>
<Directory "/usr/lib/cgi-bin">
AllowOverride None
Options +ExecCGI -MultiViews +SymLinksIfOwnerMatch
Order allow,deny
Allow from all
</Directory>ErrorLog ${apache_LOG_DIR}/error.log
# Possible values include: debug, info, notice, warn, error, crit,
# alert, emerg.
LogLevel warnCustomLog ${apache_LOG_DIR}/access.log combined
Alias /doc/ "/usr/share/doc/"
<Directory "/usr/share/doc/">
Options Indexes MultiViews FollowSymLinks
AllowOverride None
Order deny,allow
Deny from all
Allow from 127.0.0.0/255.0.0.0 ::1/128
</Directory></VirtualHost>
301 Redirects with Apache
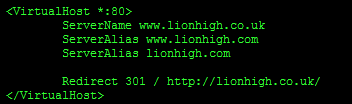
Lets start with some 301 redirects. There are several places we can make this happen. My own personal preference is to place the redirects at the top of the sites file. It makes them easier to find if you have more than one website to manage. These days www. is classed as a subdomain, most sites don't differentiate www.lionhigh.co.uk and lionhigh.co.uk. This is because most of the people who visit your site will likely never appreciate the difference. As a web developer you need to at least acknowledge the difference. Search engines will count your domain and your www. subdomain as duplicate content, if you don't setup a forward. Personally I like the version without the www. much more, its less to type and technically correct, the only issue with this is that a lot of users think that the www. is required and get confused when its missing. You should also consider setting up forwards for more domain names. You may want to forward yoursite.com to yoursite.co.uk, not forgetting www.yoursite.com too. Add the following at the top of your site file.
<VirtualHost *:80>
ServerName www.lionhigh.co.uk
ServerAlias www.lionhigh.com
ServerAlias lionhigh.comRedirect 301 / http://lionhigh.co.uk/
</VirtualHost>
Now when anyone types any of these addresses into their web browser or gets linked to them their browser will always show the contents at lionhigh.co.uk. ServerName is the web address your server will listen for. If you want it to listen for more web addresses you need to add these as ServerAlias. You can have as many Aliases as you like but only one Name, although they are effectively the same thing. After the aliases we tell apaches what to do once it has caught the domain names. In this case all we are doing is redirecting the website to the address mysite.co.uk. We will deal with mysite.co.uk further down the file. You will notice that there is a "*:80" at the top in the first virtual this tells this host to listen on port 80. Our redirect in this example will only work for port 80. If we decide later to use a different port we may need to add a redirect for that port too. For example we may use port 443 for a secure conection, we will get to that later.
Apache site configuration
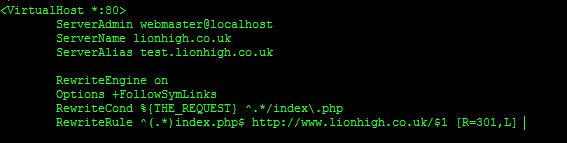
Ok lets take a look at the most important section of the file. Practically every site will have the next section. When you copied the default site file there would already have been one virtual host in it. This virtual host is fine for very basic http setups with a couple of additions but we are going to expand on it a little too. It should also be the second virtual host in this file if you have been following along. The first thing inside this virtual host is the Server Admin. This is the email address of who is running the website. This email address will only get displayed in the case of a server problem but make sure its one that's in use so in the unlikely event of issues you at least give your users chance to contact you. Immediately after the ServerAdmin you will need the server name and any server aliases for this virtual host. Firstly change the server admin to something other than "webmaster@localhost" and then put the following in, starting on the next line.
ServerName lionhigh.co.uk
ServerAlias test.lionhigh.co.uk
RewriteEngine on
Options +FollowSymLinks
RewriteCond %{THE_REQUEST} ^.*/index\.php
RewriteRule ^(.*)index.php$ http://www.lionhigh.co.uk/$1 [R=301,L]
The ServerName in this case should be then one you were redirecting to when you setup the 301 redirects earlier. If you want your website to come up in a browser as www.lionhigh.co.uk then you need to swap these round. The server alias setup here is for our test site. We are going to actually set up two Drupal sites, one for testing and one production site. We are basically telling apache that lionhigh.co.uk and test.lionhigh.co.uk are stored in the same directory on our server and that it should apply the same settings to both of them in the file below. That directory is the one we will be putting Drupal in and then we will use Drupal to decide which site to display.
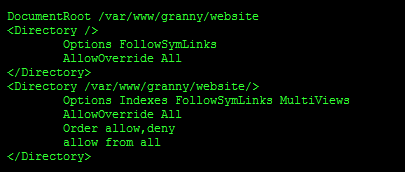
Next we need to actually tell apache where our web server files live. You'll notice after the part we just added is DocumentRoot. This folder should be the folder we copy our Drupal files into. You will notice it is currently set to /var/www and if you take a look in that directory you will find a basic HTML file containing the default apache landing page. We need to configure this so that it points to the directory we created earlier for granny. Change the Document Root to "/var/www/granny/website". This is the folder we gave our new user, granny, access to earlier. Also look down a little further and you will see a couple of <Directory> tags, one of which contains "/var/www/". We need to also change this to "/var/www/granny/website/". Notice there is a trailing slash on that one, it needs to be there. We also need to setup apache to allow overrides. This is a requirement for some of the things we will be doing later. You will notice that "AllowOverride None" appears a number of times in the file. You need to change some of these to "AllowOverride All". The ones you need to change will be the ones wrapped in the first 2 pairs of <Directory> Tags.
Apache log files
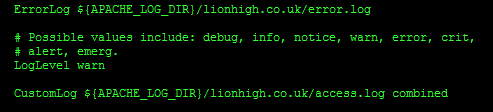
Now again we are going to assume that once we setup our nice new home web server we are going to get bugged by family members to host sites for us. It would be helpful to separate the log files so that they don't go into the same log file. This isn't strictly necessary but it makes finding errors easier should you have problems later. By default apache keeps two log files, an error log and an access log. They are both stored in the apache Log directory, which is configured elsewhere. You will notice the variable ${apache_LOG_DIR}. Change the lines that refer to the log files to read as follows.
ErrorLog ${apache_LOG_DIR}/lionhigh.co.uk/error.log
and
CustomLog ${apache_LOG_DIR}/lionhigh.co.uk/access.log
This will separate all the files for this website into its own folder.
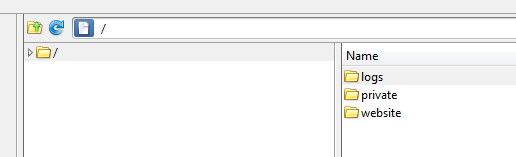
Now we have separate logs for granny's website we need to give her access to them. She may never use them but lets give her access anyway. Unfortunately we can't use symbolic links to do this. We put granny in a chroot jail earlier so she does not have access to the rest of our server. If we created a symbolic link only users able to see the whole file system would be able to see the logs. Granny would be told that the directory does not exist. To get around this problem most modern operating systems have the ability to mount a file system location in more than one place. We can mount the log files in /var/log/apache/lionhigh.co.uk AND we can mount this folder to /var/www/granny/logs. The data inside the folder will refer to the same data on the hard drive but it will appear to be different folders depending on where you view it from. Run these commands
cd /var/log/apache2
sudo mkdir lionhigh.co.uk
cd /var/www/granny
sudo mkdir logs
sudo mount --bind /var/log/apache2/lionhigh.co.uk /var/www/granny/logs
This creates the a folder in our logs directory "/var/log/apache2/lionhigh.co.uk" to correspond to granny's website. Then we create a folder for granny to view the logs "/var/www/granny/logs". Then finally we bind them to the same mount point. granny should now be able to see the logs folder if she connects via ftp but will only be able to see her own logs.

Enabling mod rewrite
Now we have our apache site configuration setup we need to setup apaches rewrite module. This allows apache to rewrite urls so that one url can become another. To do this run this command
sudo a2enmod rewrite
You will be told to restart apache for this configuration to take effect. Ignore this for now.

Lastly and most importantly we need to enable our site. without doing this apache would continue to only listen to the default site. You need to do this for every site file you create. In my case...
sudo a2ensite lionhigh.co.uk
This enables your site and warns you to restart apache. lionhigh.co.uk should be the name of the file you put in /etc/apache2/sites-available.

You may also want to disable apache's default site configuration since you will be using your own now. Run these commands
sudo a2dissite default
sudo a2dissite default-ssl
Apache server name
One last thing before we restart our server. You may have noticed that you are getting an error message from apache every time you reboot or reload apaches configuration. If your not quick you may have missed it but here it is.
apache2: Could not reliably determine the server's fully qualified domain name, using 127.0.1.1 for ServerName
To get rid of this error message we need to edit our httpd.conf file stored here /etc/apache2/httpd.conf. Open it in a text editor. It should be empty. Add this line.
ServerName localhost
And finally restart apache.
sudo service apache2 restart

HTTPS with mod ssl
Now lets get some security for our site with mod ssl. A lot of people place the ssl configuration and standard configuration in seperate files. This is just a matter of organisation and personal preference. The idea is to have each VirtualHost in its own file so if anything ever goes wrong while configuring one you can selectively enable/disable each Vhost. Practically speaking you could disable ssl and leave your normal site enabled. Personally though I find it much easier to put all the vhosts that correspond to a particular website in the same file so thats what I will be doing here. If you decide to put yours in seperate files then dont forget to enable them with "sudo a2ensite filename". Again we will use the default-ssl file as a template, here it is.
<IfModule mod_ssl.c><VirtualHost _default_:443>ServerAdmin webmaster@localhostDocumentRoot /var/www<Directory />Options FollowSymLinksAllowOverride None</Directory><Directory /var/www/>Options Indexes FollowSymLinks MultiViewsAllowOverride NoneOrder allow,denyallow from all</Directory>ScriptAlias /cgi-bin/ /usr/lib/cgi-bin/<Directory "/usr/lib/cgi-bin">AllowOverride NoneOptions +ExecCGI -MultiViews +SymLinksIfOwnerMatchOrder allow,denyAllow from all</Directory>ErrorLog ${APACHE_LOG_DIR}/error.log# Possible values include: debug, info, notice, warn, error, crit,# alert, emerg.LogLevel warnCustomLog ${APACHE_LOG_DIR}/ssl_access.log combinedAlias /doc/ "/usr/share/doc/"<Directory "/usr/share/doc/">Options Indexes MultiViews FollowSymLinksAllowOverride NoneOrder deny,allowDeny from allAllow from 127.0.0.0/255.0.0.0 ::1/128</Directory># SSL Engine Switch:# Enable/Disable SSL for this virtual host.SSLEngine on# A self-signed (snakeoil) certificate can be created by installing# the ssl-cert package. See# /usr/share/doc/apache2.2-common/README.Debian.gz for more info.# If both key and certificate are stored in the same file, only the# SSLCertificateFile directive is needed.SSLCertificateFile /etc/ssl/certs/ssl-cert-snakeoil.pemSSLCertificateKeyFile /etc/ssl/private/ssl-cert-snakeoil.key# Server Certificate Chain:# Point SSLCertificateChainFile at a file containing the# concatenation of PEM encoded CA certificates which form the# certificate chain for the server certificate. Alternatively# the referenced file can be the same as SSLCertificateFile# when the CA certificates are directly appended to the server# certificate for convinience.#SSLCertificateChainFile /etc/apache2/ssl.crt/server-ca.crt# Certificate Authority (CA):# Set the CA certificate verification path where to find CA# certificates for client authentication or alternatively one# huge file containing all of them (file must be PEM encoded)# Note: Inside SSLCACertificatePath you need hash symlinks# to point to the certificate files. Use the provided# Makefile to update the hash symlinks after changes.#SSLCACertificatePath /etc/ssl/certs/#SSLCACertificateFile /etc/apache2/ssl.crt/ca-bundle.crt# Certificate Revocation Lists (CRL):# Set the CA revocation path where to find CA CRLs for client# authentication or alternatively one huge file containing all# of them (file must be PEM encoded)# Note: Inside SSLCARevocationPath you need hash symlinks# to point to the certificate files. Use the provided# Makefile to update the hash symlinks after changes.#SSLCARevocationPath /etc/apache2/ssl.crl/#SSLCARevocationFile /etc/apache2/ssl.crl/ca-bundle.crl# Client Authentication (Type):# Client certificate verification type and depth. Types are# none, optional, require and optional_no_ca. Depth is a# number which specifies how deeply to verify the certificate# issuer chain before deciding the certificate is not valid.#SSLVerifyClient require#SSLVerifyDepth 10# Access Control:# With SSLRequire you can do per-directory access control based# on arbitrary complex boolean expressions containing server# variable checks and other lookup directives. The syntax is a# mixture between C and Perl. See the mod_ssl documentation# for more details.#<Location />#SSLRequire ( %{SSL_CIPHER} !~ m/^(EXP|NULL)/ \# and %{SSL_CLIENT_S_DN_O} eq "Snake Oil, Ltd." \# and %{SSL_CLIENT_S_DN_OU} in {"Staff", "CA", "Dev"} \# and %{TIME_WDAY} >= 1 and %{TIME_WDAY} <= 5 \# and %{TIME_HOUR} >= 8 and %{TIME_HOUR} <= 20 ) \# or %{REMOTE_ADDR} =~ m/^192\.76\.162\.[0-9]+$/#</Location># SSL Engine Options:# Set various options for the SSL engine.# o FakeBasicAuth:# Translate the client X.509 into a Basic Authorisation. This means that# the standard Auth/DBMAuth methods can be used for access control. The# user name is the `one line' version of the client's X.509 certificate.# Note that no password is obtained from the user. Every entry in the user# file needs this password: `xxj31ZMTZzkVA'.# o ExportCertData:# This exports two additional environment variables: SSL_CLIENT_CERT and# SSL_SERVER_CERT. These contain the PEM-encoded certificates of the# server (always existing) and the client (only existing when client# authentication is used). This can be used to import the certificates# into CGI scripts.# o StdEnvVars:# This exports the standard SSL/TLS related `SSL_*' environment variables.# Per default this exportation is switched off for performance reasons,# because the extraction step is an expensive operation and is usually# useless for serving static content. So one usually enables the# exportation for CGI and SSI requests only.# o StrictRequire:# This denies access when "SSLRequireSSL" or "SSLRequire" applied even# under a "Satisfy any" situation, i.e. when it applies access is denied# and no other module can change it.# o OptRenegotiate:# This enables optimized SSL connection renegotiation handling when SSL# directives are used in per-directory context.#SSLOptions +FakeBasicAuth +ExportCertData +StrictRequire<FilesMatch "\.(cgi|shtml|phtml|php)$">SSLOptions +StdEnvVars</FilesMatch><Directory /usr/lib/cgi-bin>SSLOptions +StdEnvVars</Directory># SSL Protocol Adjustments:# The safe and default but still SSL/TLS standard compliant shutdown# approach is that mod_ssl sends the close notify alert but doesn't wait for# the close notify alert from client. When you need a different shutdown# approach you can use one of the following variables:# o ssl-unclean-shutdown:# This forces an unclean shutdown when the connection is closed, i.e. no# SSL close notify alert is send or allowed to received. This violates# the SSL/TLS standard but is needed for some brain-dead browsers. Use# this when you receive I/O errors because of the standard approach where# mod_ssl sends the close notify alert.# o ssl-accurate-shutdown:# This forces an accurate shutdown when the connection is closed, i.e. a# SSL close notify alert is send and mod_ssl waits for the close notify# alert of the client. This is 100% SSL/TLS standard compliant, but in# practice often causes hanging connections with brain-dead browsers. Use# this only for browsers where you know that their SSL implementation# works correctly.# Notice: Most problems of broken clients are also related to the HTTP# keep-alive facility, so you usually additionally want to disable# keep-alive for those clients, too. Use variable "nokeepalive" for this.# Similarly, one has to force some clients to use HTTP/1.0 to workaround# their broken HTTP/1.1 implementation. Use variables "downgrade-1.0" and# "force-response-1.0" for this.BrowserMatch "MSIE [2-6]" \nokeepalive ssl-unclean-shutdown \downgrade-1.0 force-response-1.0# MSIE 7 and newer should be able to use keepaliveBrowserMatch "MSIE [17-9]" ssl-unclean-shutdown</VirtualHost></IfModule>
Before we get to the editing part lets enable Apache's ssl module. To do this use this command.
sudo a2enmod ssl
You can ignore the bit about restarting Apache, we will do that after we have finished editing the site file.

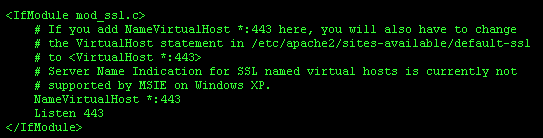
Now we need to add something tom Apache's ports.conf file. Open it with "sudo nano /etc/apache2/ports.conf". There are two sets of <IfModule> tags. The first of which is "mod_ssl.c". By default this will contain the "Listen 443" command. On the line before this we need to add "NameVirtualHost *:443", so that it looks like this.
<IfModule mod_ssl.c>
# If you add NameVirtualHost *:443 here, you will also have to change
# the VirtualHost statement in /etc/apache2/sites-available/default-ssl
# to <VirtualHost *:443>
# Server Name Indication for SSL named virtual hosts is currently not
# supported by MSIE on Windows XP.
NameVirtualHost *:443
Listen 443
</IfModule>
Don't worry about the bit that is commented out for now. We are not using default-ssl, we just need to make sure we configure our site file correctly
If your going to copy default-ssl into one sites file like I am this is easier to do in a gui. I use notepadd++ so I can copy and paste from one file to the other. To be able to do this we need to make the file we want to edit writable, in this case /etc/apache2/sites-available/lionhigh.co.uk. To make it writable run this.
sudo chmod 666 /etc/apache2/sites-available/lionhigh.co.uk
Now you should be able to edit your site file but it is important that after you are done you reset the permissions so the file is protected from unauthorised writing.
sudo chmod 644 /etc/apache2/sites-available/lionhigh.co.uk
Now you should be able to open "default-ssl" and your site file in your favourite text editor via your favourite ftp program.
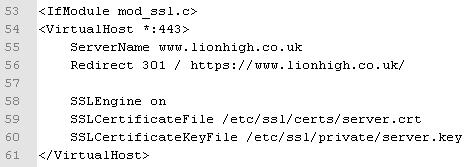
You will notice that wrapped around the virtual host in default-ssl is a pair of <ifmodule> tags. Copy the entire default-ssl file to the bottom of your site file. Now we are going to start by making the same changes we did in the above section. Start by adding this just after the first ifmodule tag.
<VirtualHost *:443>ServerName www.lionhigh4.co.ukRedirect 301 / https://lionhigh4.co.uk/
SSLEngine on
SSLCertificateFile /etc/ssl/certs/server.crt
SSLCertificateKeyFile /etc/ssl/private/server.key</VirtualHost>
Take note that the port number this time is 443, the port number for https and the redirect redirects to an address starting https instead of http. This will ensure that https sites get redirected in the same way http ones do. The SSL part does not really do anything here as this part is a redirect but if we don't include it Apache will spit out an error stating that an ssl Vhost needs it.
Now as before we need to set a ServerName, ServerAlias and Rewrite directives.
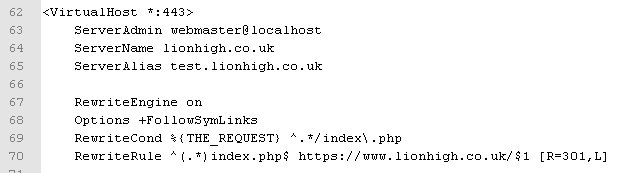
You will also need to change the DocumentRoof, Directory, AllowOverrides, and log file locations just as you did before.
Now our the ssl part of the file starts to look a little different. Luckily you can ignore most of the file as its just commented out instructions for various configurations and the bit you need is right at the top. Your looking for ServerCertificateFile and ServerCertificateKeyFile. They will both be together. They will currently be configured to use snakeoil certificates, which if your using self signed certificates might as well be what you use as they both have little value. Change both to read this.
SSLCertificateFile /etc/ssl/certs/server.crt
SSLCertificateKeyFile /etc/ssl/private/server.key
Thats pretty much it for now, save the file, re-upload it and make sure you don't forget to change the permissions back. Then restart apache and your good to go.
sudo service apache2 restart
Results
As promised here is the completed file I created during this example.
<VirtualHost *:80>ServerName www.lionhigh.co.ukRedirect 301 / http://lionhigh.co.uk/</VirtualHost><VirtualHost *:80>ServerAdmin webmaster@localhostServerName lionhigh.co.ukServerAlias test.lionhigh.co.ukRewriteEngine onOptions +FollowSymLinksRewriteCond %{THE_REQUEST} ^.*/index\.phpRewriteRule ^(.*)index.php$ http://www.lionhigh.co.uk/$1 [R=301,L]DocumentRoot /var/www/granny/lionhigh.co.uk<Directory />Options FollowSymLinksAllowOverride All</Directory><Directory /var/www/granny/lionhigh.co.uk/>Options Indexes FollowSymLinks MultiViewsAllowOverride AllOrder allow,denyallow from all</Directory>ScriptAlias /cgi-bin/ /usr/lib/cgi-bin/<Directory "/usr/lib/cgi-bin">AllowOverride NoneOptions +ExecCGI -MultiViews +SymLinksIfOwnerMatchOrder allow,denyAllow from all</Directory>ErrorLog ${APACHE_LOG_DIR}/lionhigh.co.uk/error.log# Possible values include: debug, info, notice, warn, error, crit,# alert, emerg.LogLevel warnCustomLog ${APACHE_LOG_DIR}/lionhigh.co.uk/access.log combinedAlias /doc/ "/usr/share/doc/"<Directory "/usr/share/doc/">Options Indexes MultiViews FollowSymLinksAllowOverride NoneOrder deny,allowDeny from allAllow from 127.0.0.0/255.0.0.0 ::1/128</Directory></VirtualHost><IfModule mod_ssl.c><VirtualHost *:443>ServerName www.lionhigh.co.ukRedirect 301 / https://www.lionhigh.co.uk/SSLEngine onSSLCertificateFile /etc/ssl/certs/server.crtSSLCertificateKeyFile /etc/ssl/private/server.key</VirtualHost><VirtualHost *:443>ServerAdmin webmaster@localhostServerName lionhigh.co.ukServerAlias test.lionhigh.co.ukRewriteEngine onOptions +FollowSymLinksRewriteCond %{THE_REQUEST} ^.*/index\.phpRewriteRule ^(.*)index.php$ https://www.lionhigh.co.uk/$1 [R=301,L]DocumentRoot /var/www/granny/lionhigh.co.uk<Directory />Options FollowSymLinksAllowOverride All</Directory><Directory /var/www/granny/lionhigh.co.uk/>Options Indexes FollowSymLinks MultiViewsAllowOverride AllOrder allow,denyallow from all</Directory>ScriptAlias /cgi-bin/ /usr/lib/cgi-bin/<Directory "/usr/lib/cgi-bin">AllowOverride NoneOptions +ExecCGI -MultiViews +SymLinksIfOwnerMatchOrder allow,denyAllow from all</Directory>ErrorLog ${APACHE_LOG_DIR}/lionhigh.co.uk/error.log# Possible values include: debug, info, notice, warn, error, crit,# alert, emerg.LogLevel warnCustomLog ${APACHE_LOG_DIR}/lionhigh.co.uk/ssl_access.log combinedAlias /doc/ "/usr/share/doc/"<Directory "/usr/share/doc/">Options Indexes MultiViews FollowSymLinksAllowOverride NoneOrder deny,allowDeny from allAllow from 127.0.0.0/255.0.0.0 ::1/128</Directory># SSL Engine Switch:# Enable/Disable SSL for this virtual host.SSLEngine on# A self-signed (snakeoil) certificate can be created by installing# the ssl-cert package. See# /usr/share/doc/apache2.2-common/README.Debian.gz for more info.# If both key and certificate are stored in the same file, only the# SSLCertificateFile directive is needed.SSLCertificateFile /etc/ssl/certs/server.crtSSLCertificateKeyFile /etc/ssl/private/server.key# Server Certificate Chain:# Point SSLCertificateChainFile at a file containing the# concatenation of PEM encoded CA certificates which form the# certificate chain for the server certificate. Alternatively# the referenced file can be the same as SSLCertificateFile# when the CA certificates are directly appended to the server# certificate for convinience.#SSLCertificateChainFile /etc/apache2/ssl.crt/server-ca.crt# Certificate Authority (CA):# Set the CA certificate verification path where to find CA# certificates for client authentication or alternatively one# huge file containing all of them (file must be PEM encoded)# Note: Inside SSLCACertificatePath you need hash symlinks# to point to the certificate files. Use the provided# Makefile to update the hash symlinks after changes.#SSLCACertificatePath /etc/ssl/certs/#SSLCACertificateFile /etc/apache2/ssl.crt/ca-bundle.crt# Certificate Revocation Lists (CRL):# Set the CA revocation path where to find CA CRLs for client# authentication or alternatively one huge file containing all# of them (file must be PEM encoded)# Note: Inside SSLCARevocationPath you need hash symlinks# to point to the certificate files. Use the provided# Makefile to update the hash symlinks after changes.#SSLCARevocationPath /etc/apache2/ssl.crl/#SSLCARevocationFile /etc/apache2/ssl.crl/ca-bundle.crl# Client Authentication (Type):# Client certificate verification type and depth. Types are# none, optional, require and optional_no_ca. Depth is a# number which specifies how deeply to verify the certificate# issuer chain before deciding the certificate is not valid.#SSLVerifyClient require#SSLVerifyDepth 10# Access Control:# With SSLRequire you can do per-directory access control based# on arbitrary complex boolean expressions containing server# variable checks and other lookup directives. The syntax is a# mixture between C and Perl. See the mod_ssl documentation# for more details.#<Location />#SSLRequire ( %{SSL_CIPHER} !~ m/^(EXP|NULL)/ \# and %{SSL_CLIENT_S_DN_O} eq "Snake Oil, Ltd." \# and %{SSL_CLIENT_S_DN_OU} in {"Staff", "CA", "Dev"} \# and %{TIME_WDAY} >= 1 and %{TIME_WDAY} <= 5 \# and %{TIME_HOUR} >= 8 and %{TIME_HOUR} <= 20 ) \# or %{REMOTE_ADDR} =~ m/^192\.76\.162\.[0-9]+$/#</Location># SSL Engine Options:# Set various options for the SSL engine.# o FakeBasicAuth:# Translate the client X.509 into a Basic Authorisation. This means that# the standard Auth/DBMAuth methods can be used for access control. The# user name is the `one line' version of the client's X.509 certificate.# Note that no password is obtained from the user. Every entry in the user# file needs this password: `xxj31ZMTZzkVA'.# o ExportCertData:# This exports two additional environment variables: SSL_CLIENT_CERT and# SSL_SERVER_CERT. These contain the PEM-encoded certificates of the# server (always existing) and the client (only existing when client# authentication is used). This can be used to import the certificates# into CGI scripts.# o StdEnvVars:# This exports the standard SSL/TLS related `SSL_*' environment variables.# Per default this exportation is switched off for performance reasons,# because the extraction step is an expensive operation and is usually# useless for serving static content. So one usually enables the# exportation for CGI and SSI requests only.# o StrictRequire:# This denies access when "SSLRequireSSL" or "SSLRequire" applied even# under a "Satisfy any" situation, i.e. when it applies access is denied# and no other module can change it.# o OptRenegotiate:# This enables optimized SSL connection renegotiation handling when SSL# directives are used in per-directory context.#SSLOptions +FakeBasicAuth +ExportCertData +StrictRequire<FilesMatch "\.(cgi|shtml|phtml|php)$">SSLOptions +StdEnvVars</FilesMatch><Directory /usr/lib/cgi-bin>SSLOptions +StdEnvVars</Directory># SSL Protocol Adjustments:# The safe and default but still SSL/TLS standard compliant shutdown# approach is that mod_ssl sends the close notify alert but doesn't wait for# the close notify alert from client. When you need a different shutdown# approach you can use one of the following variables:# o ssl-unclean-shutdown:# This forces an unclean shutdown when the connection is closed, i.e. no# SSL close notify alert is send or allowed to received. This violates# the SSL/TLS standard but is needed for some brain-dead browsers. Use# this when you receive I/O errors because of the standard approach where# mod_ssl sends the close notify alert.# o ssl-accurate-shutdown:# This forces an accurate shutdown when the connection is closed, i.e. a# SSL close notify alert is send and mod_ssl waits for the close notify# alert of the client. This is 100% SSL/TLS standard compliant, but in# practice often causes hanging connections with brain-dead browsers. Use# this only for browsers where you know that their SSL implementation# works correctly.# Notice: Most problems of broken clients are also related to the HTTP# keep-alive facility, so you usually additionally want to disable# keep-alive for those clients, too. Use variable "nokeepalive" for this.# Similarly, one has to force some clients to use HTTP/1.0 to workaround# their broken HTTP/1.1 implementation. Use variables "downgrade-1.0" and# "force-response-1.0" for this.BrowserMatch "MSIE [2-6]" \nokeepalive ssl-unclean-shutdown \downgrade-1.0 force-response-1.0# MSIE 7 and newer should be able to use keepaliveBrowserMatch "MSIE [17-9]" ssl-unclean-shutdown</VirtualHost></IfModule>